Friday, 28 February 2014

Baking | Cinnamon Apples


Ingredients
6 Bramley Apples
1/2 Cup Muscavado Sugar
1/4 Cup Water
Squeeze Lemon Juice
2 Tsp Cinnamon

Peel, core and slice the apples
Put them in a bowl with the sugar and cinnamon
Stir the apples until they are evenly coated
Add the water and lemon to a saucepan and simmer, add the apple mixture.
Simmer slowly until softened to your liking.

Make sure you taste, if too sour add more sugar a little at a time.

For crumble filling I cook the apples until soft, for pie filling I halve the cooking time and keep the apples shape.

I cooked these apples as they had been lying around for a week and I thought I would freeze them. I poured them from the saucepan into a plastic freezer bag to cool, I left a gap in the bag to allow steam to escape.

I flattened the bag and lay it flat in the freezer so it would be really quick to defrost when needed.


I will use this when pushed for time, maybe just heated and served with ice cream or with some pastry and made into a pie or crumble.

Friday, 14 February 2014

Recipe | Italian Lentil & Bean Stew

This recipe isn't Italian at all, well it might be but I made it up as I went along and the only time I have been to Italy I was ten years old and I went with my dad to collect something and we got arrested for doing a u-turn and I got locked in an office while dad was made to go to a cash point to withdraw cash for a fine... think this was in Rome? I will ask him. Anyway, we ate junk food from a petrol station and got the hell out of there so when I see Jamie Oliver cooking up Italian feasts I create Italian inspired food in my brain and it comes out in recipes like this. Tangent? Yep. Here is the recipe.

You will need:

A Large Saucepan
Olive Oil
2 Onions
3 Garlic Cloves
Chunk of Root Ginger

1 Courgette
2 Peppers
2 Sweet Potatoes

3 Vegetable Stock Cubes
1 Pint of Boiling Water

1 Tin of Tomatoes
4 Tablespoons of Tomato Puree

1 Tin Cannellini Beans
100g Red Lentils

2 Tablespoons of Dried Oregano
Salt and Pepper

This recipe makes enough for 10 generous servings.


Dried Oregano, Vegetable Stock Cube & Garlic Cloves.

Cannellini Beans, Red Lentils, Sweet Potato, Ginger, Courgette, Red & Orange Pepper.

Diced Courgette & Red Pepper

Red Lentils, Ginger & Sweet Potato

Cannellini Beans

34p Tesco Tinned Plum Tomatoes

At 34p for 6 large plum tomatoes, I think this tin is great value.

Roughly chop the tomatoes (or squish them in your hands & throw them in the pot)

Sweat the chopped onion in Olive Oil

Add the Courgettes & Peppers
Soften the veg and brown the mixture slightly.

Add the grated Ginger.

Add the stock, tinned tomatoes, red lentils & cannellini beans.

Stir well and simmer for an hour.

Leave on a very low heat for as long as you can, 1 hour or longer.


Monday, 10 February 2014

Baking | Mocha Tray Bake


On Sunday we all fancied something sweet so I looked in the cupboards but there wasn't a lot left, I managed to find an almost empty tub of cocoa powder but there was only 1.5 oz left so I decided to make what I call a 5oz cake and baked it in a tray. I also added 2 tablespoons of coffee and chicory essence to deepen the flavour as I usually add a larger ratio of cocoa to flour when making chocolate cakes and I didnt feel the small amount of cocoa I had would be enough to create a nice chocolaty cake. 

3.5 oz Self Raising Flour
1.5 oz Cocoa Powder
1 Tsp Baking Powder
5 oz Caster Sugar
5 oz Butter
2 Large Eggs
1 Tsp Vanilla Extract
2 Tbsp Camp Coffee & Chicory Essence 
2 Tbsp Milk

Prepare a flat tin, perhaps a brownie tin or a small swiss roll tin. 
Grease the sides with butter and swirl flour on the top to create a non-stick surface.
Also add a rectangle of baking parchment to prevent the bottom sticking.

Pre-heat the oven to Gas Mark 3

TIP |
It's not always neccessary to line every tin with baking parchment every time you bake, it depends on the cake, the tin and the recipe but I ALWAYS do because it takes less than 5 minutes and it guarantees your cake will slip out onto the wire rack easily!


HOW |
Cream together the butter and the sugar until it pales and becomes fluffy.
Sieve the flour, cocoa powder and baking powder into the bowl.
Add the eggs, vanilla extract, milk and camp coffee and chicory essence to the bowl.
Slowly combine with a wooden spoon or use an electric mixer.
Use a spatula to scrape down the sides of the bowl and incorporate all of the ingredients.

Pour or dollop the mixture into your tin and very gently smooth and even out the batter.
Bake in the oven for 15-20 minutes.

Remove from the oven and turn onto a wire rack to cool.

Mix 2 oz butter with 2 tbs of cocoa powder and 2 tbs camp coffee and chicory essence.
Then combine 6 oz icing sugar until stiff.

When the cake is cool, probably after at least 1 hour, spread over the cake with a spoon or metal spatula.

You can eat straight away!


Tuesday, 4 February 2014

Baking | Rose Elliott "Nut Roast"

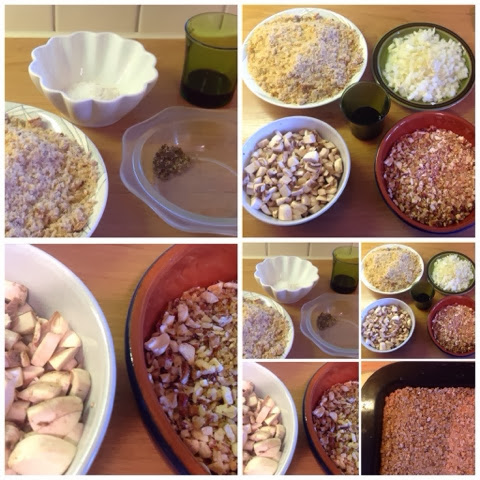
I made a nut roast for Sunday lunchand served it with new potatoes, broccolli, carrots and mushrooms. The recipe also gives you instructions to make a sauce, which is actually more like a thick gravy, using onions, soy sauce and stock.


Saturday, 1 February 2014

Baking | Beetroot, Apple & Walnut Cake

I recently visited my Grandmother and I made her a cake. I wanted it to be nourishing and full of healthy ingredients but not low fat or low calorie as she needs high calorie snacks and things in her cupboards for when she doesn't feel like cooking (being 80+ that is a lot of the time) I also wanted the cake to be long lasting and if she eats it in 7 to 10 days it would be ok, possibly even spread with butter (we are talking about a lady who doesn't bin a n y t h i n g !).

I made her a massive jug of fresh beetroot, carrot & apple juice with an inch of root ginger thrown in for good measure, I used the pulp from the juicer to make the cake. I find some juices I make, the pulp is useless as it is dry and tasteless (parsley, celery) or too bitter (lemons and oranges) but some combinations are tasty and feel like they have some life left in them! 

Ingredients:
6oz self raising flour
6oz butter
6oz eggs (3 large)
6oz muscavado sugar
1tsp baking powder
3oz walnuts
9oz juicer pulp
Splash of the juice to loosen the mixture
Zest of 1 orange

Also:
A loaf cake tin 
Pre-heat oven to gas mark 4 
(Use middle shelf)

In a big bowl, cream together the butter and the muscavado sugar until it is well combined and softened, it will become smooth and whipped, you can use a wooden spoon and elbow grease or a mixer.

Sieve the flour into the bowl with the baking powder, crack the eggs and add them to the bowl then stir once or twice to lightly combine.

Now add the pulp and walnuts to the bowl with a splash (perhaps 1 or 2 tablespoons) of the juice or juice of an orange if you prefer.

Mix until combined but do not over stir. Use a spatula to clean down the sides and base of the bowl to incorporate every scrap of mixture. 

Do not push the mixture down into the tin but do gently smooth the top.

I used a rather floppy and cumbersome silicon loaf tin, I usually use a non-stick tin but being at my Grandmother's house I had to use her one. It is a nice shape, with a stable base unlike other silicon cake pans I have used before and it is from Lakeland.

I think this tin has been discontinued at Lakeland (www.lakeland.co.uk) but you can obtain similar ones. Once I was used to the silicon cake tin it I actually was very impressed, when the cake was cooked it slid out very easily and the silicon wasn't too hot to touch.

Cook the cake for 30-40 minutes on gas mark 4, use the middle shelf. 

If the cake colours too quickly place a slip of foil over the top and remove 5 minutes before removing from the oven. This will let the cake cook but should slow the top down and stop it browning and even burning.

Once the cake has cooled for 5/10 minutes slip out of the cake tin and cool on a wire rack.

When 100% cold place in an airtight container.
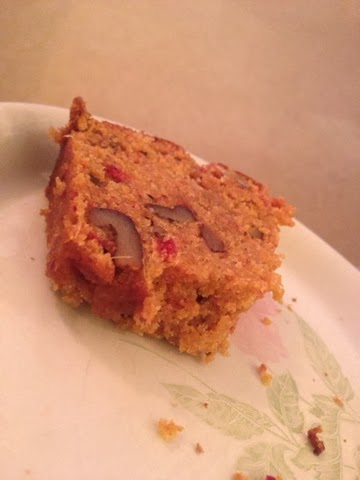
The cake came out the oven and it has completely lost the pink colour. I was hugely impressed with the course texture of fibre and the walnuts. It was light and moist but substantial. This cake should be dense but moist and not too sweet. 

The muscavado creates a rich flavour with a deeper colour and feels more natural than using caster sugar. I found the cake tin which was a smidgen too small so I cut a slice off, this cake tin seemed ideal as you can see through it and my Nanny would not forget it was in there! When I sliced into the loaf you can see wonderful pieces of beetroot, carrot and ginger and the lovely chunks of walnut.


Do you have any good uses for the fibrous pulp that comes out your juicer?

Wednesday, 8 January 2014

Baking | Peach & Almond Traybake

I have always used the method of weighing my ingredients in ounces aka oz. This is because I was taught by my Nanny how to bake using "MerryBerry" cook books from the age of three or four, now we are being swayed into using grams but I find the old fashioned way better. 

I always end up baking at other peoples houses and not having my cake tins or equipment or even recipe books so I figured out the relatively fail safe way of making cakes with no recipe and the way of modifying recipes by using the all-in-one recipe of sponge where you use equal measures of ingredients and then eggs. Once I heard Mary Berry weighed her eggs too then I was sold and this is how I now do everything and I always invent recipes by starting from this point and then perfecting the bake again and again. It always works for me. Sometimes it works well and sometimes it works but it could be better!

To use up a glut of peaches or nectarines, I made this tray bake at a friends house. (You can alternatively use a tin of peach halves.)

10 oz recipe to fit into the large foil tray, half every ingredient to fit into a standard baking tray.

Writing the recipe:
10oz Self Raising flour
10oz Golden Caster Sugar
10oz Butter 
2tsp Baking Powder
Weigh your eggs to 10oz, just pop them in a bowl on your scales (in their shell!) this will probably be 3, 4 or 5 depending on size.

Now, I wrote the above recipe and then I thought "right, well I want to add an Almond flavour so I replaced 3oz of Self Raising Flour with Ground Almonds, this is because you don't need both. The Ground Almonds will lighten the texture and absorb some moisture from the peaches. I also weighed 5oz of Sliced Almonds to sprinkle on top.

The Ingredients:

7oz Self Raising flour
3oz Ground Almonds
10oz Golden Caster Sugar
10oz Butter  (You can use margarine or baking fat but I prefer the taste of butter.)
2tsp Baking Powder
5oz Sliced Almonds
4 Peaches or Nectarines, cut in half
Eggs | Weigh your eggs to 10oz, just pop them in a bowl on your scales (in their shell!) this will probably be 3,4 or 5 depending on size.

Get the ingredients to room temperature about 30 minutes before baking.

Cream together the Sugar and the Butter with a wooden spoon or mixer until it becomes paler. 
(I use a hand mixer as I prefer to feel the thickness and the "feel" of the mixture. I also feel I am in more control.)

Then sift in the flour and baking powder, add the eggs, ground almonds.

Mix gently until combined, the longer you mix the heavier the sponge when cooked.

Pour the mixture into a greased and lined foil tray.

Sprinkle on the Almond Slices

Squidge in the halves of fruit evenly.

The mixture will start to cover the peaches but don't worry, this will taste nice by creating texture, plus it will look nice. The peaches will draw the Sliced Almonds into the cake mixture, I like this because you get groups of almonds around the peaches as well as a few on top resulting in bursts of flavour among the cake in different bites.

Bake the cake on a middle shelf on Gas Mark 4 for 30 minutes. 

Do not open the oven until 20 minutes have passed AT LEAST because the cake will sink. 

Stab the cake in the centre with a skewer (avoid the peaches because skewering a moist peach won't be accurate test).

If the metal implement comes out clean the cake is ready to come out the oven, if not, bake for another 5 minutes at a time.

Sprinkle a little sugar on top of the cake.

Leave the cake to cool for 10 minutes before turning out onto a wire rack. 

NB: I am new to this blogging malarkey, in future I will take more photos, ones of the cake sliced and served etc… I bet you can't wait.


Tuesday, 7 January 2014

Recipe | Ginger Marmalade


Ginger Marmalade

This year for Christmas I made a batch of ginger marmalade using a huge amount of ginger to make a strong and fiery preserve with subtle Christmassy flavours.

Recipe: 

500g Root Ginger | Peeled and chopped into bite size pieces 
6 Pieces of Stem Ginger | Cut roughly into matchsticks
Powdered Ginger | 4 Tablespoons
All Spice | 1 Tablespoon
1 Cooking Apple | Chopped into cubes
Water | 250ml approximately to cover the ginger and apple mixture
250g Jam Sugar 


Put the Root Ginger and Apple into a large saucepan and add the water.

If you can, use the largest saucepan you have to hand, I think it it safer and you have more room to work with in case you want to modify the recipe.

Simmer until the Root Ginger is tender and soft.

Add the Stem Ginger, Powdered Ginger, All Spice and Sugar to the pan.

Simmer for 1 hour.

After 1 hour you can test the consistency by spooning a dollop onto a plate and leaving to cool and then running your finger through it, like the parting of the red sea the two sides of the marmalade should stay separated.

If it sets then it is ready, if not, add a few tablespoons more Jam Sugar.

Add the mixture to sterilised jars.

Add a circle of greaseproof paper to the top and close the lids.

The heat from the mixture will seal the jars airtight and help preserve the marmalade.

Throughout making this recipe I tasted the concoction to make sure it was fiery enough, feel free to add more ginger and alter the ingredients to taste. This mixture is really gingery and in the spring I will make another batch but I will omit the All-Spice as this ingredient is great for Winter and the festive period but not for Spring Summer.